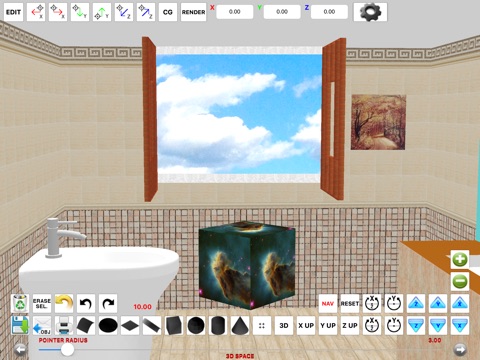
"Finger3D HD" turns your device into a three-dimensional modeler, the smallest and portable existing 3D modeler.
With "Finger3D HD" you can create any shape/object/3D model, modeling the shapes with the fingers of your hands.
To create Your 3D MODEL, You will have the 3D geometric primitives (spheres, cylinders, cones, cubes, planes, surfaces, discs, curves, etc...) typically used in the commercial 3D modelers for the PC or MAC.
You can manage the parameters for lighting (eg. lamp position), material (eg. material’s color, textures), the object transparency, etc...
You can navigate the 3D WORLD using the fingers of your hands; you can use the 3D view, the top view (Y UP), right view (X UP), frontal view (Z UP).
You can explore the 3D WORLD using the first person view (NAVIGATION MODE).
You can model the objects in the 3D WORLD, scale, rotate, move the vertices dragging Your fingers on the screen or use the blue 3D ball pointer to select/move objects/vertices/faces.
You can quickly locate the pointer in the 3D space by writing the X, Y, Z coordinates, using the “pointer move” buttons (along the axes X, Y, Z).
The size of the objects can be defined, during insertion, with the "POINTER RADIUS" control or using the scale feature (in editing mode).
With "POINTER RADIUS" you can select one or more vertices/objects/faces; increasing the size of the "POINTER RADIUS" You can select multiple components.
Instruments for the 3D modeling:
0) CHARACTER MODELING using BACKGROUND IMAGES
1) MODEL with fingers: move the touched vertices by dragging Your finger on the screen
2) SUBDIVIDE: divide one or more faces into 4 or more faces for each face
3) EXTRUDE: extrusion perpendicular or oblique for faces or vertices (extrusion direction: from the center of the selected face to the center of the 3D pointer or along the three axes X,Y,Z)
4) SMOOTH: useful for the creation of mountains
5) VLINK: move the vertices in the center of the 3D pointer (useful to create arrows, beaks of animals, aircraft, wings, etc...)
6) COPY/PASTE
7) COPY MIRROR (respect the chosen axis or along it)
8) ERASE VERTICES / FACES
9) FACES EDITING / VERTICES EDITING
10) REVOLVE
11) REVOLVE "SPIN"
12) REVOLVE "BASE FACE" (to create people with one click)
13) MOVE
14) 3D and 2D views
15) SMOOTH SHADING, FLAT SHADING, WIREFRAME
16) GROUP/UNGROUP
17) UNDO/REDO
etc…
The model may be manually or automatically saved for later use, exported to OBJ+MTL format and then be sent via e-mail or loaded in the common 3D modelers for the PC o MAC (ex. Maya 3D, Blender, etc...).
RENDERING: the generated JPG/PNG image according to the policy "render what you see" will be saved in the device’s photo album (can be sent by e-mail if necessary).
PERSPECTIVE and ORTHOGRAPHIC projections.
The “Projects Archive” allows storing, management, loading and merging projects.
You can see the model in all its parts, activating the animation.
The ability to apply textures photographed (with the camera of the device) to the 3D model will give you the feeling of working with real 3D models.
The 3D graphics has been fully implemented using OpenGL, with the graphic acceleration used for the PC games.
Useful for all types of use: for Engineers (computer, mechanical, electrical, chemical), Architects (eg. design and rendering), Chemicals (ex. design of molecules), Astronauts, Astronomers, Designers, Filmmakers, Gamers, Biologists, Interior Designers, etc...
Finger3D has been designed to work well together to FingerCAD: You can model in a 3D WORLD the design started with a 2D CAD, apply textures to the 3D model, explore the CAD design using the first person view (3D CAD VIRTUAL REALITY NAVIGATION feature), create realistic images using the rendering procedure.
Finger3D extra screenshots:
http://www.ngcybit.it/iTunesApp/finger3d/finger3d-hd-screen-shots.html
Documentation:
http://www.ngcybit.it/iTunesApp/finger3d/finger3d-quick-users-guide.html


